Introduction to Liquiflow — How to build Shopify themes with Webflow
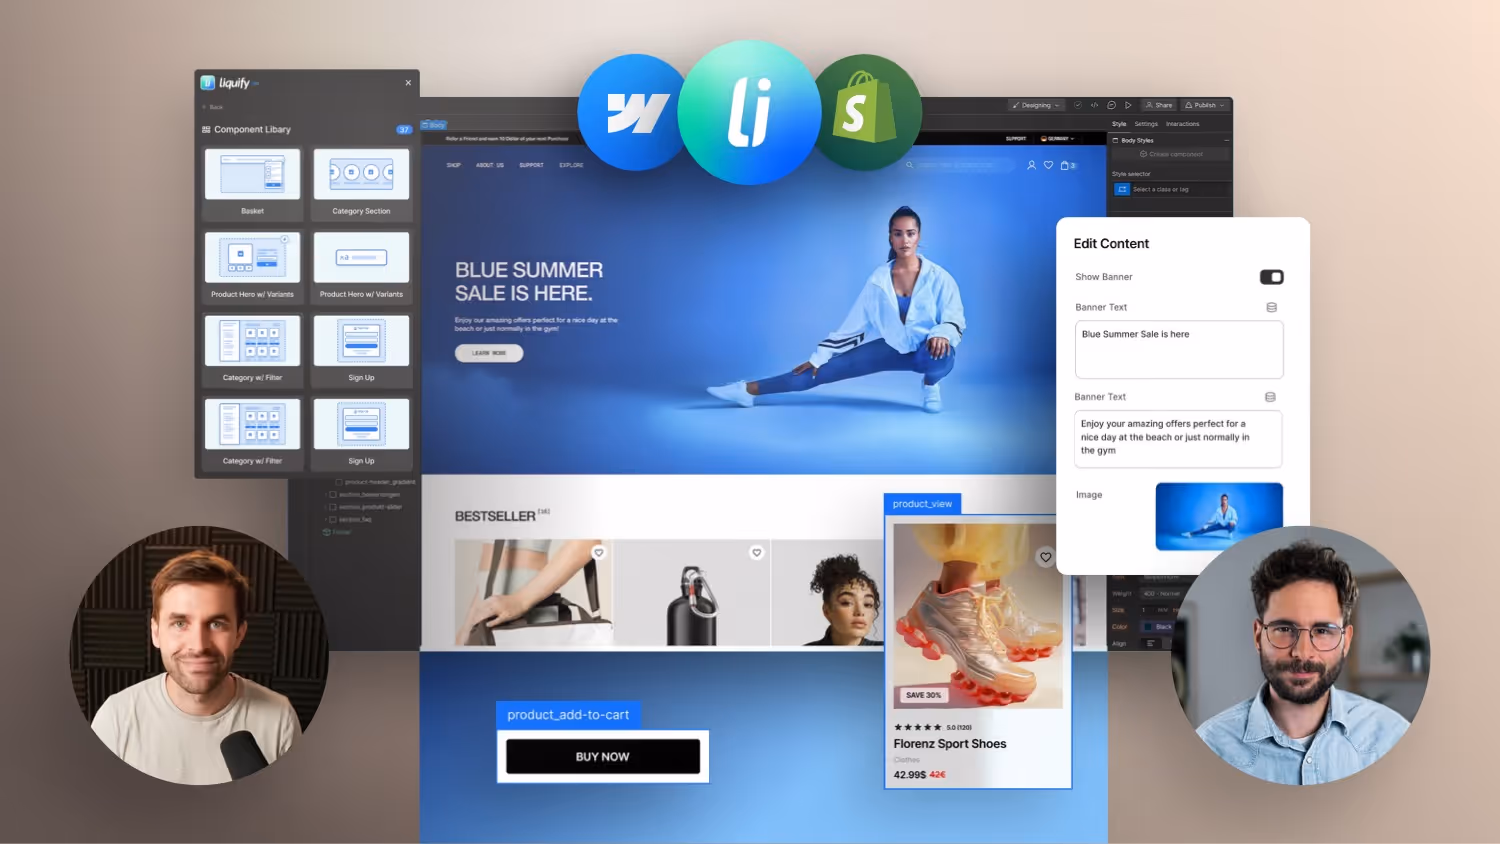

In this video, Marvin Blach shows his Liquiflow tool, which is based on Webflow and enables custom Shopify themes. Not a tutorial for creating a complete theme, but an overview of features such as structured tagging, Shopify block elements, dynamic content, and the Section Converter. You'll get a feel for how Liquify works with Webflow and Shopify and how to create dynamically customizable themes. Have fun!
Click here for Liquify: https://www.liquiflow.app
Introduction
Liquiflow is a tool that turns webflow projects into fully editable Shopify themes. In this post, you'll learn how to use Custom Attributes works in Webflow, which automatically translates Liquiflow into Shopify-compatible liquid code. This allows you to create themes that are visually sophisticated and can be flexibly customized in the Shopify editor — without manual programming.
Webflow as a blueprint: Working with custom attributes
Liquify uses Webflow's Custom Attributes as a basis. You assign specific attributes to HTML elements such as li-object, li-settings, li-for or li-if too. These define which data Shopify will display later and whether the content can be edited dynamically or in the editor.
example:
li-object="product.title”becomes{{product.title}}in Shopify.li-settings:text="Headline”creates an editable field in the theme editor called “Headline”.
You work with placeholders in Webflow — the customer later enters the content directly into Shopify. This is how you keep a clean structure and a lightweight theme.
Sections & block elements
All items must be in li-section-Containers are lying down. This is how Liquiflow recognizes how the theme for Shopify 2.0 should be structured. Within a section, you can Block elements (Li-block), which customers can flexibly add and arrange in the editor. This is ideal for repeatable content such as USPs, feature lists, or sliders.
In addition, there is li-Content-For-Blocks or li-content-for-theme-blocks, which you can use to organize multiple blocks within a section — even nested up to 8 levels deep.
Alpine.js & interactive features
You can create interactive logic directly in Webflow — such as a progress bar for free shipping. Using Alpine.js and attributes such as X-data and X-Show Define this functionality visually. You then define the specific values, such as thresholds, in the Shopify backend.
The Section Converter & GitHub Workflow
Liquiflow offers a Section Converter, which allows you to export Webflow sections as complete Liquid files using HTML, Liquid, and Schema. You can even add these to existing Shopify themes — you don't have to use the starter theme.
GitHub lets you version projects and manage deployments. Changes to the styling or structure are adopted cleanly, while content is retained in the Shopify CMS.
Liquid Tags, Conditions & Filters
Liquiflow supports all important liquid tags via its own attributes in Webflow:
li-for="product in collection.products”creates loopsli-if="product.available”orli-unless="product.available”for conditionsli-object="product.price | money”for filters such asMoney,Date,img_url
You can also Li Day for your own liquid commands or li-attributes use to provide classes with conditions, for example.
Conclusion: Visual design, clean code, satisfied customers
With Liquify, you design visually in Webflow and use an attribute to define what should be editable or dynamic later in Shopify. You don't need to write Liquid by hand — and yet you get clean, structured code. Ideal for high-performance, customizable Shopify themes.
→ If you love Webflow and want to use Shopify more efficiently, Liquiflow is the perfect bridge between design and code.

-blog.avif)